
01
Team Sheets
Juventus
Manager: Igor Tudor
| No | Player | Sub | Goal |
|---|---|---|---|
| 16 | Michel Di Gregorio | ||
| 3 | Bremer © | ||
| 6 | Lloyd Kelly | 90+6' | |
| 8 | Teun Koopmeiners | 69' | |
| 10 | Kenan Yildiz | 87' | 63' |
| 15 | Pierre Kalulu | ||
| 19 | Khephren Thuram | ||
| 20 | Lois Openda | 69' | |
| 22 | Weston McKennie | 59' | |
| 27 | Andrea Cambiaso | ||
| 30 | Jonathan David | 59' |
Substitutes
9-Vlahovic (59' on, 67' & 90+4' goals), 5-Locatelli (69'), 17-Adzic (69'), 25-Joa Mario (59'), 11-Zhegrova (87'), 7-Conceicao, 4-Gatti, 1-Perin (GK), 23-Pinsoglio (GK), 18-Kostic, 24-Rugani, 32-Cabal
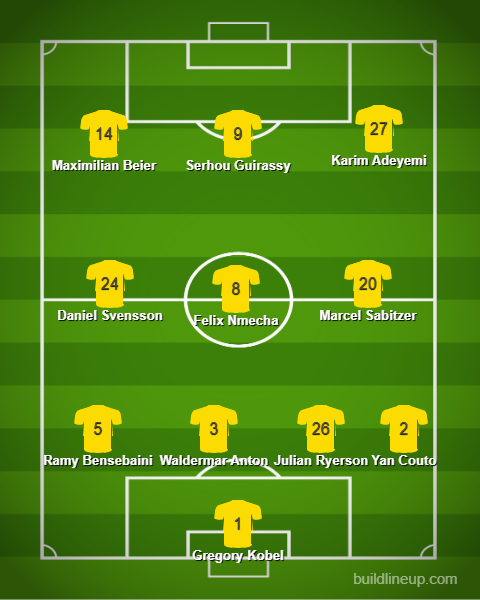
B. Dortmund
Manager: Niko Kovac
| No | Player | Sub | Goal |
|---|---|---|---|
| 1 | Gregory Kobel © | ||
| 2 | Yan Couto | 74' | |
| 3 | Waldemar Anton | ||
| 5 | Ramy Bensebaini | PK 86' | |
| 8 | Felix Nmecha | 71' | 65' |
| 9 | Serhou Guirassy | 90+2' | |
| 14 | Maximilian Beier | 71' | |
| 20 | Marcel Sabitzer | ||
| 24 | Daniel Svensson | ||
| 26 | Julian Ryerson | ||
| 27 | Karim Adeyemi | 52' |
Substitutes
7-Jobe Bellingham (71'), 10-Julian Brandt (71'), 13-Pascal Gross (90+2'), 17-Chukwuemeka, 37-Campbell, 39-Mane, 42-Kabor, 31-Ostrizinski (GK), 33-Meyer (GK)
02
Recent Form
Last 4 Matches
Injury List
Suspensions
Patrick Drews
Salih Ozcan
03
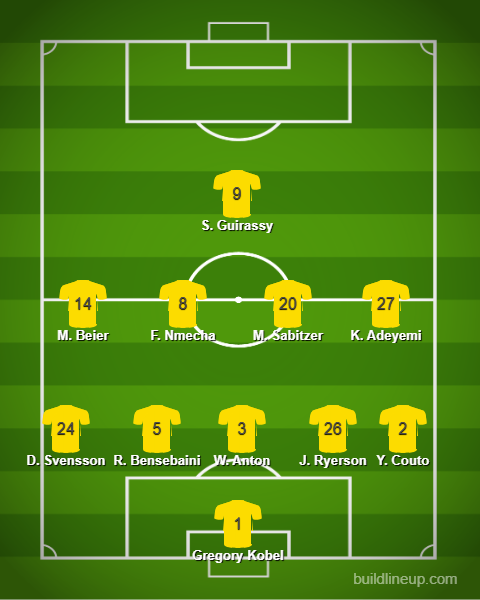
Tactical Formations
Starting Shape
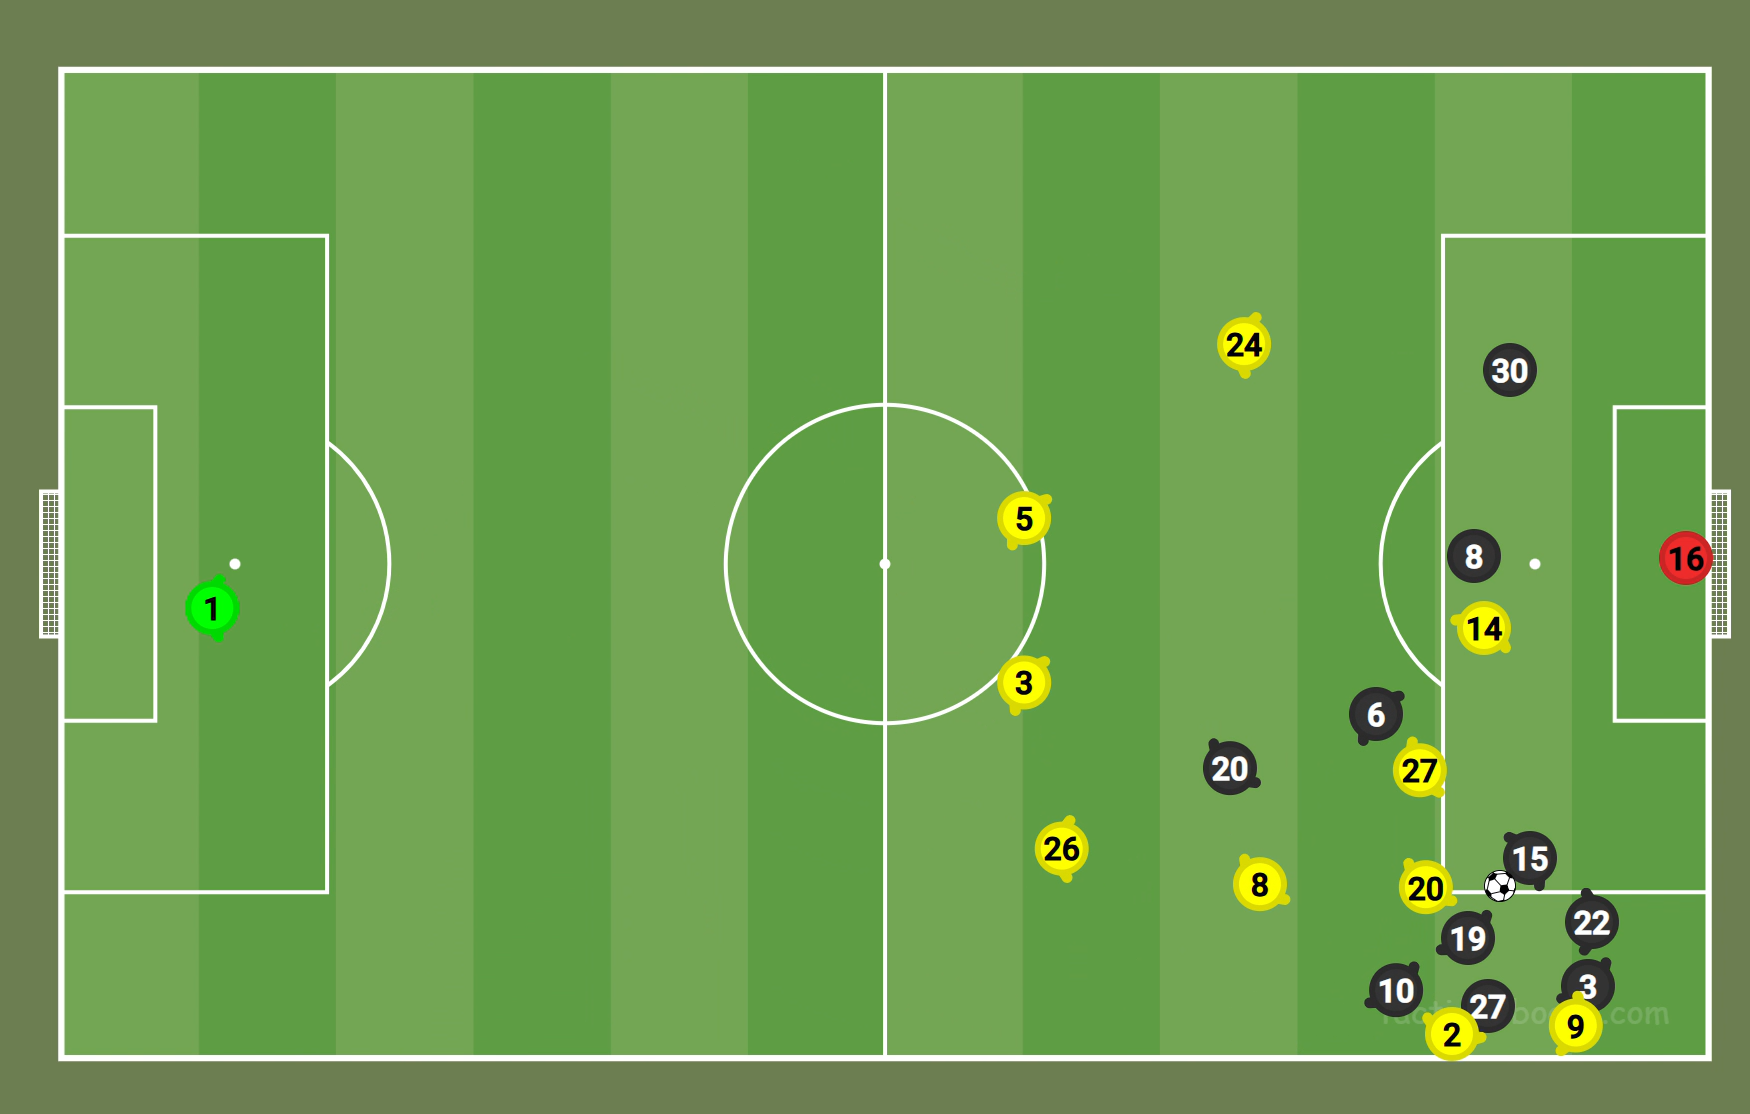
1-4-3-3
Starting formation used from kick-off. High attacking line with three forwards.
30th Minute Change
1-5-4-1
More bodies at the back and midfield to sustain Juventus pressure in the first half.
Finishing Shape
1-5-4-1

Brandt (#10) and Bellingham (#7) came on as game changers, keeping attacking tempo high.
The starting formation was a 1-4-3-3, which changed on the 30th minute to a 1-5-1-3-1, providing more bodies in the back and midfield to sustain Juventus pressure. The second half shape shifted to 1-5-4-1, providing cover at the back while increasing numbers in the final third. When the press was on, #9 and #27 and #14 stayed on the edge of the box to initiate, with #24, #8, #20 marking in zones rather than fully committing to man marking.
04
Attacking Analysis
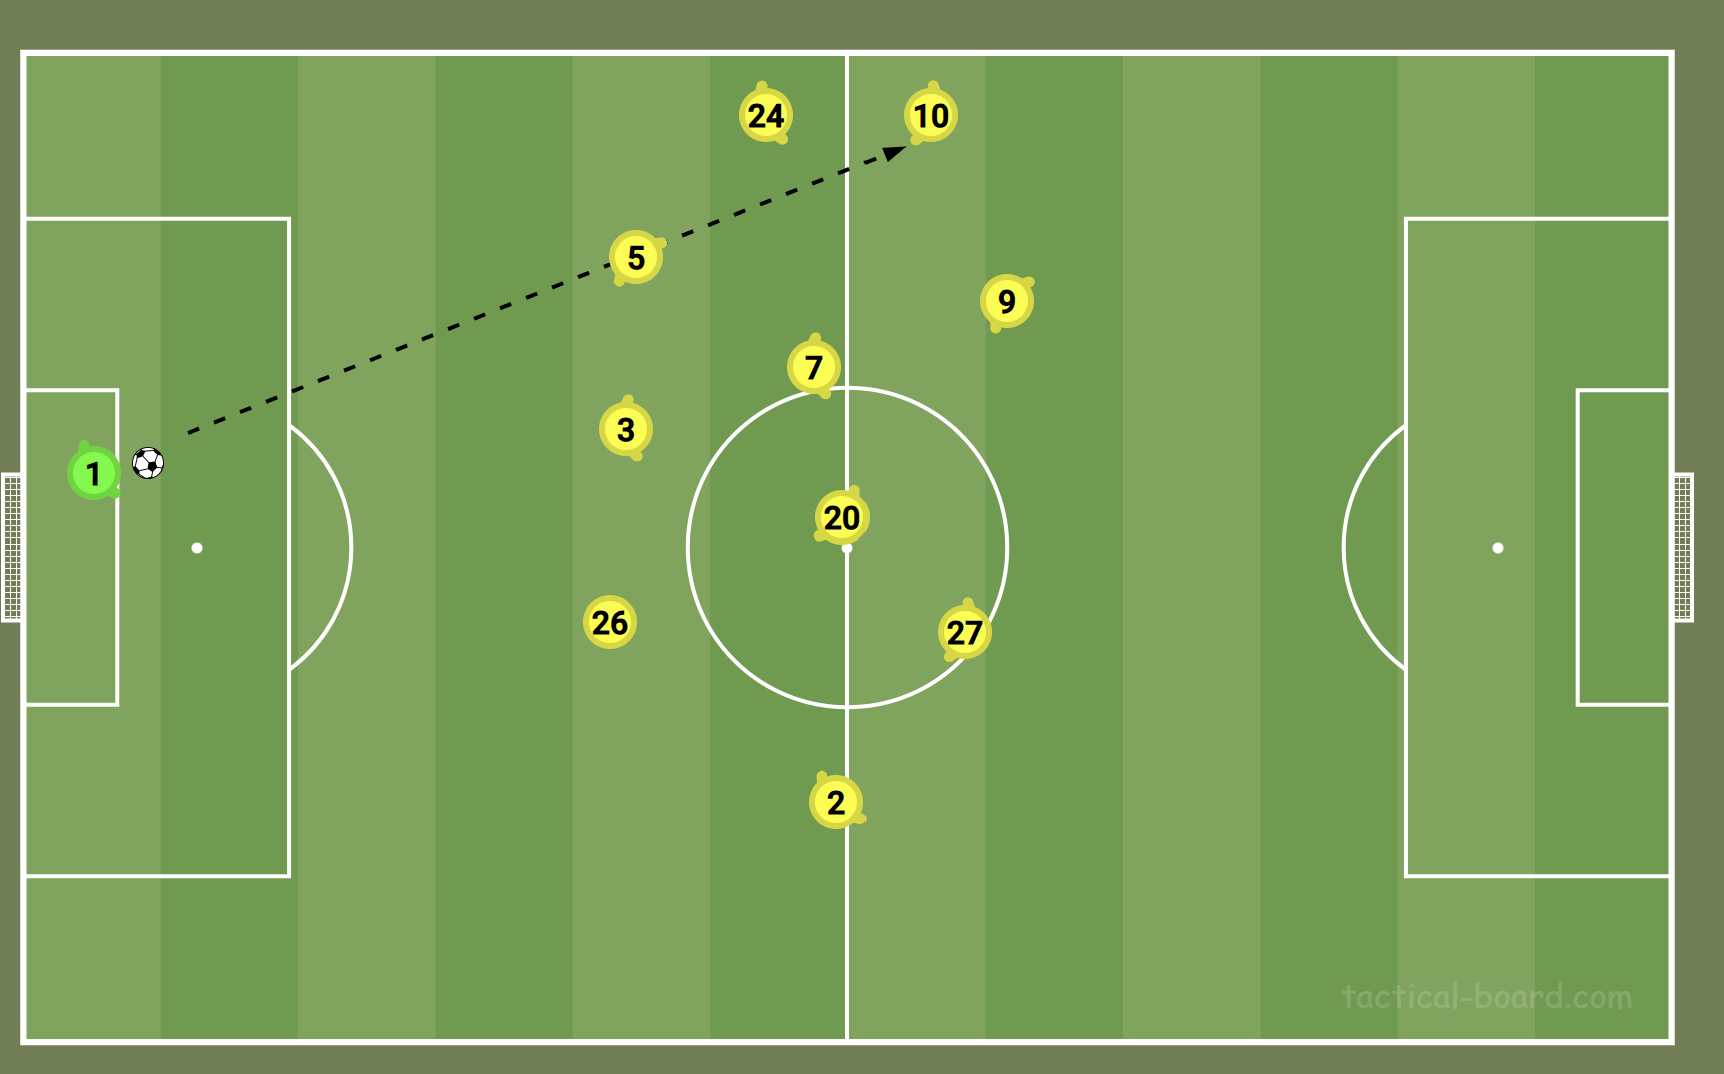
GK Restarts

1st Half — Short buildup
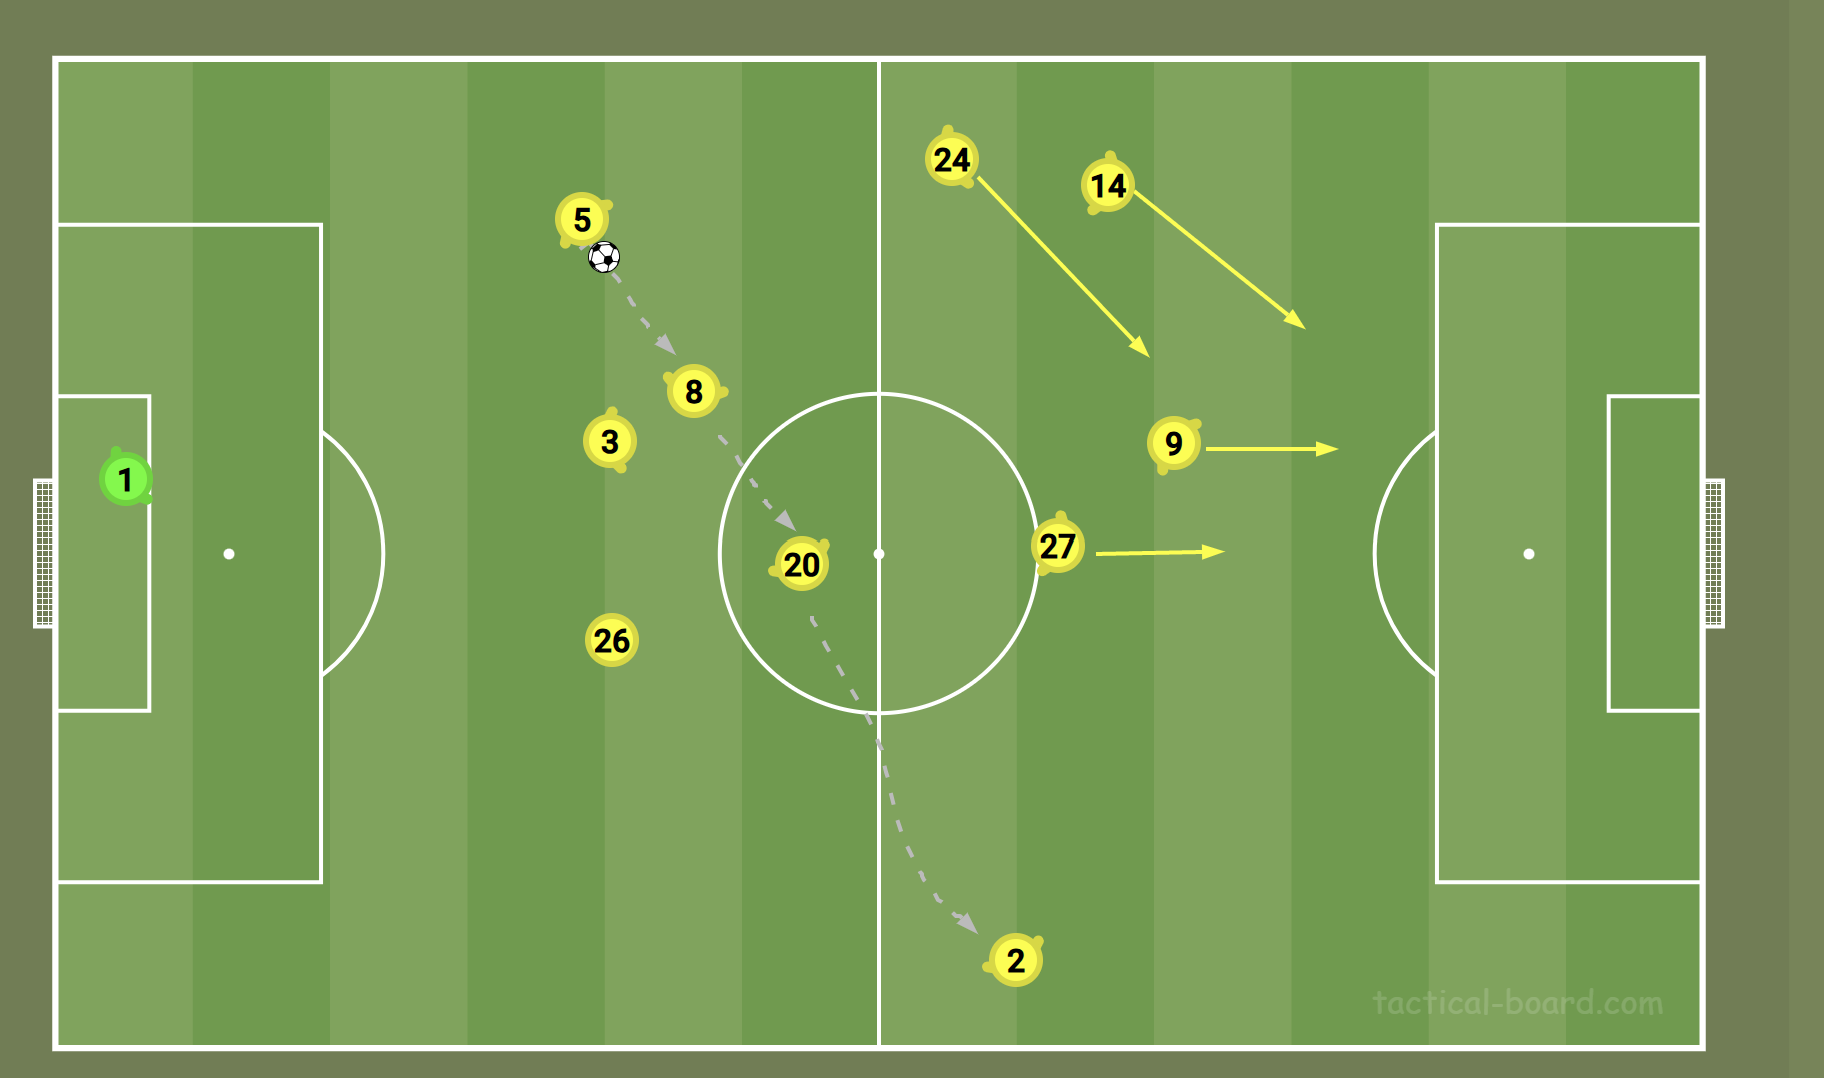
2nd Half — Direct to #10
- •Ball always played short to CBs; #3 plays directly to #14 who drops deep to receive.
- •Wide players and midfielders interchange position during restarts, creating bodies around the ball for retention or counter-pressing.
- •#5 and #8 constantly alive to 2nd balls, recovering possession multiple times.
- •GK hardly looks to throw long; when he did, it was to the FBs who played short to the winger.
- •In the 2nd half, restarts went long to #10 who tries to flick on for #9, reducing buildup time.
2nd Phase — Middle Third
Buildup through midfield
- •Balls played to CB and into midfield. Little interchange of passing — passes were more about creating spaces for 1-2s and playing out of the press.
- •Retaining possession and dictating play was the approach. Very few runners upfront, limiting through balls.
- •Slow buildup gave them numbers in the final third; short interchange created spaces behind the press.
- •More players in the final third gave control in the opposition half, where possession was quickly regained.
Last Third — Goal Sequences
4 players always in box
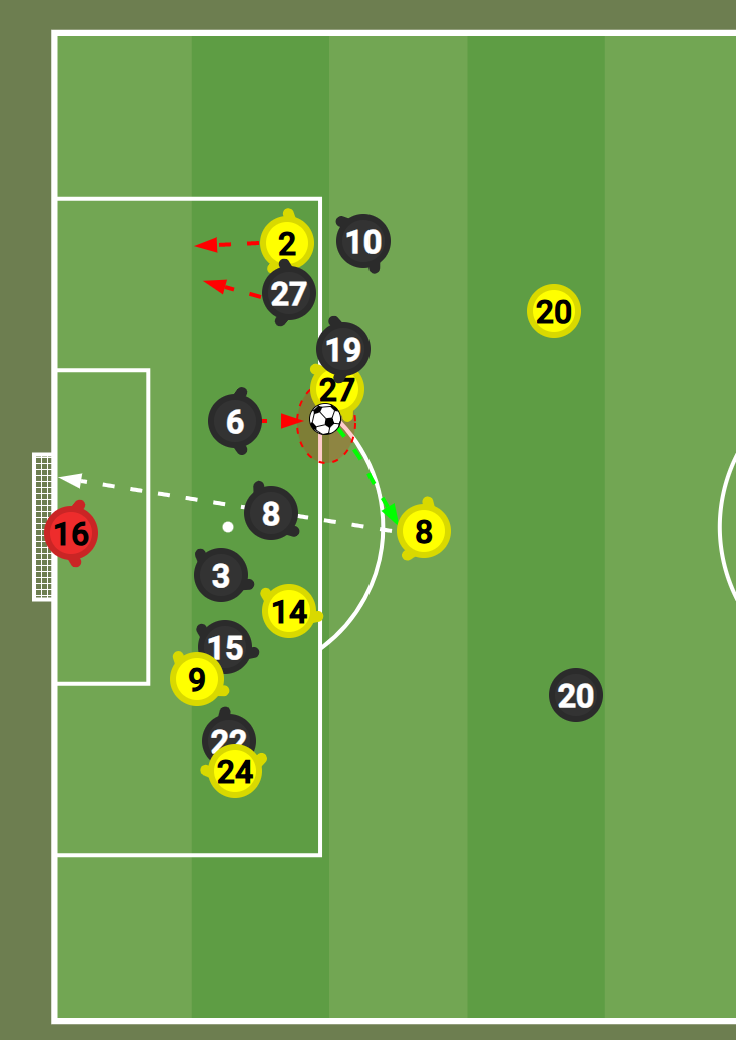
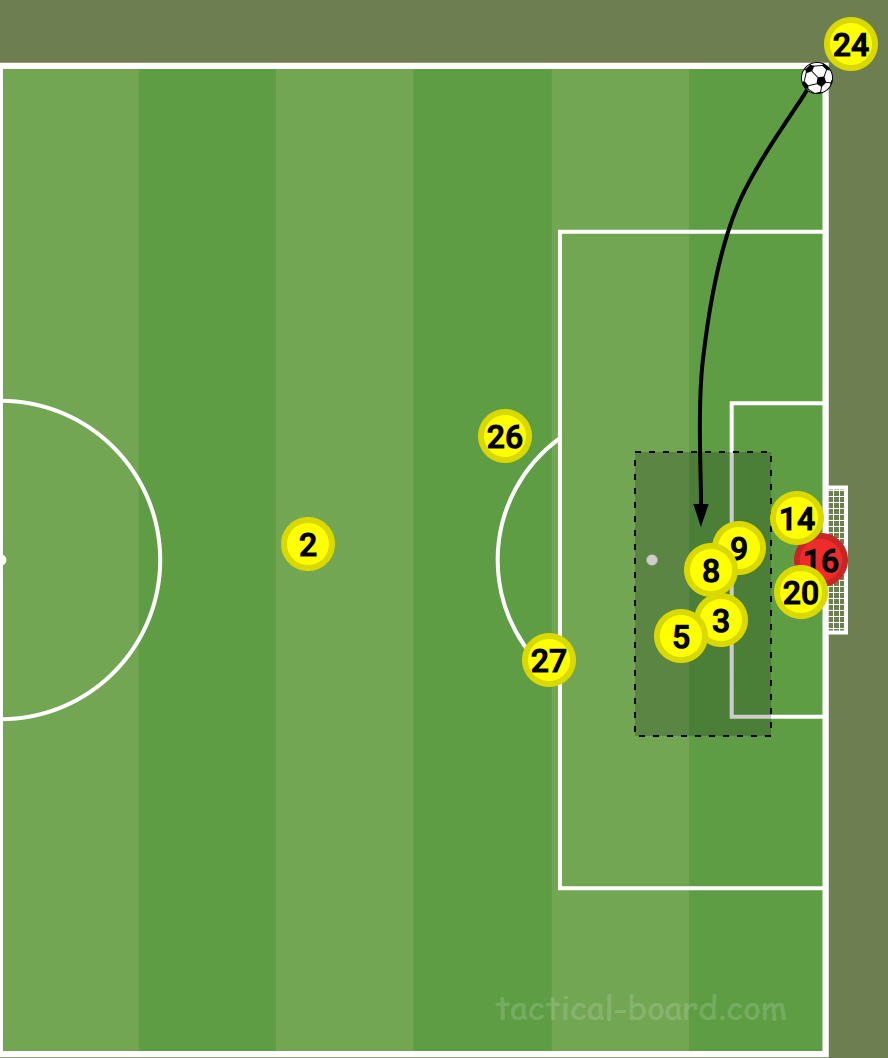
Fig 1.2 — Adeyemi goal (52')
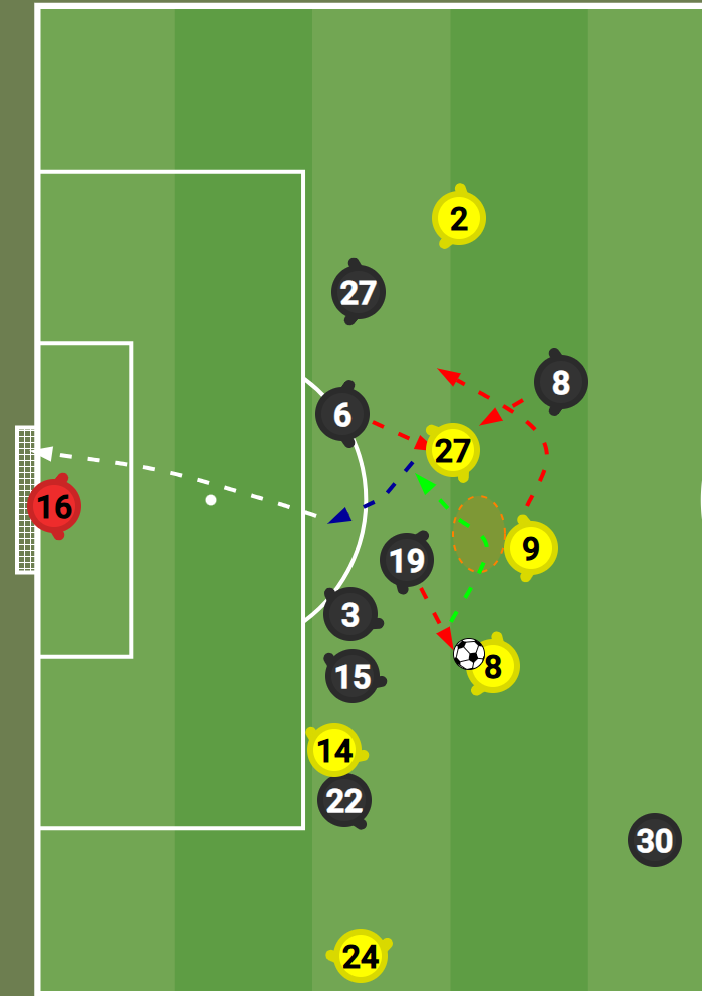
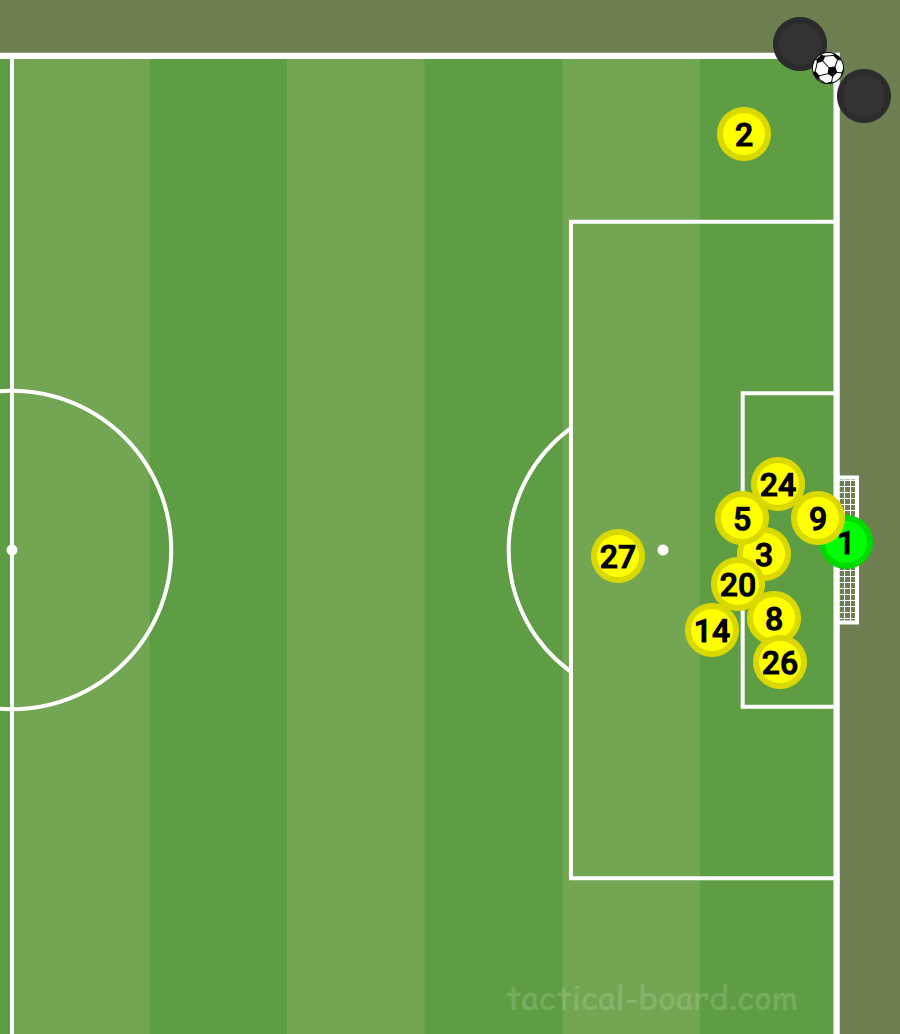
Fig 1.1 — Nmecha goal (65')
- •Formation in the final third switched between 1-1-2-3-4 and 1-3-3-4. Always 4 players in the box for short passes or cutbacks.
- •Opposition provided little space for short passes, so Dortmund took shots from outside the box — resulting in the first 2 goals.
- •Adeyemi Goal (52'): Quick ball movement — #8 drove forward, passed to #9, who played quickly to #27. Adeyemi dribbled past #6 and #8 before beating the keeper at the near post with a low driven shot.
- •Nmecha Goal (65'): #2 passed to #27 for quick interchange; when space closed, #27 passed to #8 who curled it to the top corner immediately.
05
Defensive Analysis
Press from Opposition GK
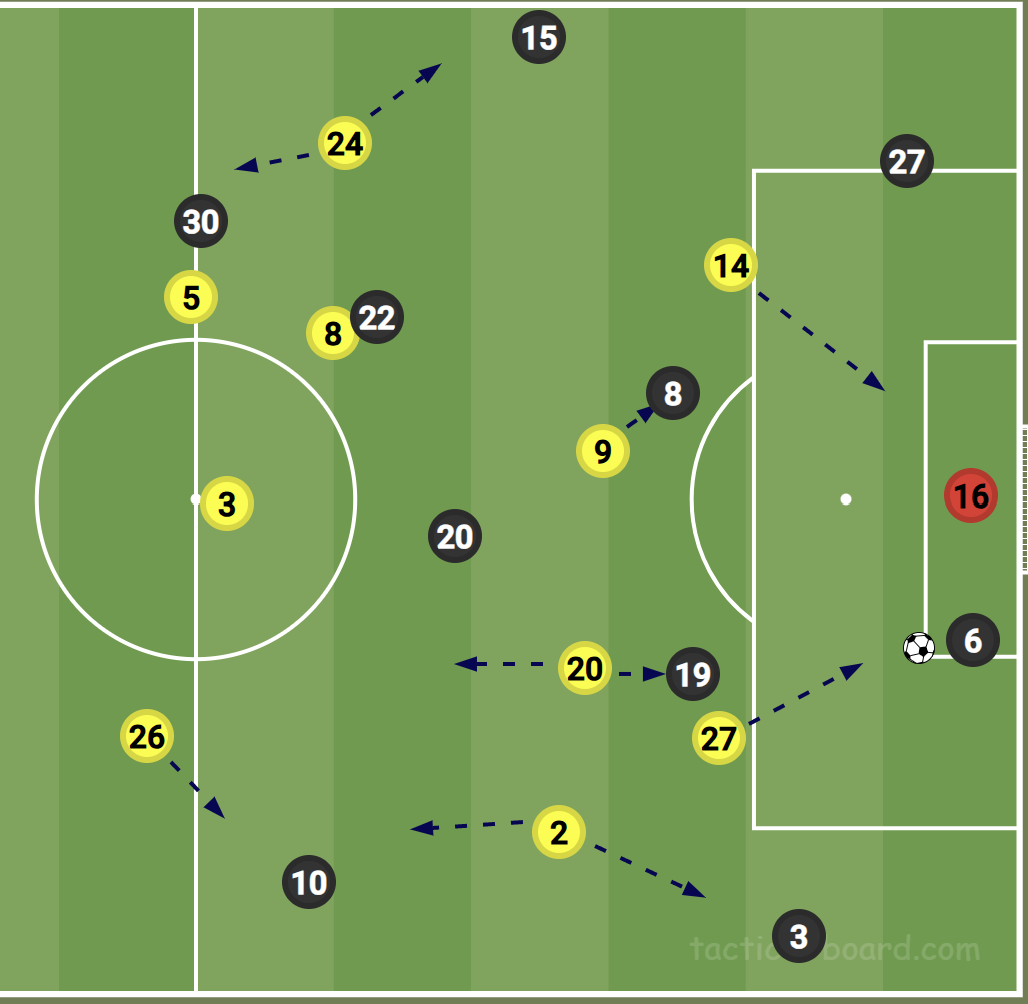
1-3-2-3-2 pressing shape
- •#27 initiates the press to #6, forcing #20 to mark #19, while #14 presses GK and blocks passing lane to #27.
- •Press wasn't always effective — ball was either played to #20 or #10 behind the press, or the press wasn't quick enough.
- •In the 2nd half the press got quicker with #20 pressing most balls in midfield and others marking in zones.
High Line & Spaces Behind

GK looped pass over the press
- •High line meant lots of spaces behind midfield after the press, and huge space behind the defensive line for direct balls.
- •Constantly tried man marking in zones with a high line throughout. Not effective as Juventus could play through or drop the ball behind midfielders.
- •Midfielders always running behind the ball rather than being able to tackle or mark who had possession.
Defensive Shape — Last Third
Mobile low block in final third
- •Formation changed between 1-5-1-3-1 and 1-5-4-1, depending on ball position in last third.
- •Maintained a very mobile low block with midfielders providing little spaces between them and defenders.
- •Defensive line was effective in catching Juventus players offside.
- •When numbers were enough, they moved as a compact line with very little space between first and second defensive lines.
06
Strengths & Weaknesses
Defensive
Strengths
Very effective defensive line and offside traps throughout the match.
More bodies in the press prevented Juventus from playing from the back consistently.
More players in the opposition half meant quick turnovers in attacking position, leading directly to 2 goals scored.
Weaknesses
Relapse in the final moments saw a breakdown in offside traps as players failed to step out quickly enough.
Very high pressing line gave lots of spaces behind the defensive line for Juventus to exploit — evident in goals conceded (#10 playing ball into space for #9).
Defensive shape reduced spaces in the box but gave space in front for Juventus to shoot from with no press or pressure, leading to another goal.
Keeping it simple at the back would have helped. Failing to clear the ball early broke the offside trap through turnovers in the last third.
Attacking
Strengths
Good possession and ball retention throughout the match.
Quick short passes to create spaces in and around the box.
More bodies in the final third gave them room for one-twos to beat markers and create shooting spaces.
Weaknesses
Failed to make the huge number of players in the opposition box count by not crossing quicker or crossing at all. Gameplay was limited to short passes only.
Loss of possession meant a high line and spaces behind for counters or long balls.
Too many players forward meant slower defensive shape recovery, which was the case for the final goal conceded.
Failed to control the game in the final moments — sent more bodies forward with a 2-goal lead, losing shape and effectiveness.
07
Set Piece Analysis
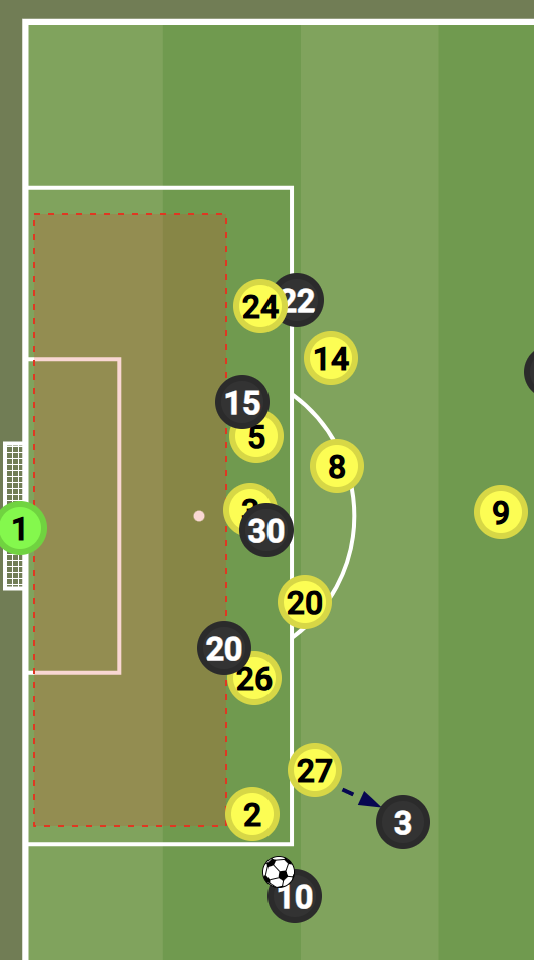
Attacking Corners
- #24 Svensson — Set piece taker
- #14 Beier — Front post run for header
- #9, #8, #3 — Contest header in the middle
- #5 Bensebaini — Back post run
- #2 Couto — Defensive position
- #27, #26 — Edge of box to attack/defend
Defending Corners
- #2 — Close to taker to prevent short corner
- #27 — Top of box to prevent ball being played outside
- #5, #20, #3 — Mark best headers from Juventus
- #8, #14, #13 — Mark other Juventus players
- #24 — Front post; #26 — Back post
- #9 — Center of box to give GK space to clear
- GK — Alone with space to come collect/punch
08
General Analysis
How many players do they have in midfield?
This varied between 4 to 3, which was dependent on the opposition's gameplay.
How deep do the flanks play? Attacking or defending?
They played high up when attacking and tucked in deep when defending.
How tall is the GK and how is he with crosses?
He is 1.96m tall and is good with crosses and getting the ball in the air.
Does the GK throw the ball out and if so who is willing to accept it?
He always played or threw it short to the CBs.
Do they build up from the back, through midfield or direct to the final 3rd?
In the 1st half they played from the back, while in the 2nd half they went directly with long balls.
How well and early do they pressure the ball?
They pressed early, right from the goal kick restarts.
Do they have any quick players?
Yes — #27 Adeyemi and #9 Guirassy.
Do they have any aggressive players?
#2 Yan Couto — aggressive in tackles and challenges.
Is there anyone frightened of a challenge?
None noticed in this game.
Were there any penalties and if so who took them and where did he place it?
Yes — lots of fuss over who should take it. #5 Bensebaini eventually played it after manager's intervention. He played it to his bottom left, pausing midair before striking with his kicking foot.
Is there anybody who did not play today that should have?
Emre Can — out injured (groin).
09
Player Analysis
Borussia Dortmund — Individual Assessments
Starting XI
| No | Name | Assessment |
|---|---|---|
| 1 | Gregor Kobel | Always came out for corner kicks and is decent in the air. Good with the ball and was a good outlet for retaining possession for his team. |
| 2 | Yan Couto | Always looking to dribble rather than pass. A great attacking threat with a nice shot into the net. However, he stayed with the ball too long and lost possession several times. |
| 3 | Waldemar Anton | Good communication, often calling teammates' attention to players and situations around them. Got a yellow card for a tactical foul, breaking up a one-two that could have led to a counter-attack 1v1 against their GK. |
| 5 | Ramy Bensebaini | Good defensive cover and generally good on the ball. Well-taken penalty kick. Good tracking and awareness, instrumental in intercepting a key pass on 20'51 to prevent a goal-scoring opportunity. However, failed to clear the ball in the final minutes, opting for a pass in the defensive third that got intercepted, bringing about the 4th goal conceded. |
| 8 | Felix Nmecha | Good on and off possession, tracked runners behind and around him. Kept passes neat and simple. Scored their second goal immediately after they conceded, curling the ball to his right with the goalkeeper thinking it was going out. Substituted 70'18 for Jobe Bellingham. |
| 9 | Serhou Guirassy | Always a good outlet when attacking, running into channels ready to receive in the middle third. Good through ball to Adeyemi to create a goal-scoring chance. Constant threat in the final third, available for short passes — took a great save to keep him off the score sheet. Substituted 90+2' for Pascal Gross. |
| 14 | Maximilian Beier | Constantly pressing and marking players in his zone. Good with the ball and helped retain possession. Substituted in the 2nd half for Julian Brandt at 70'19. |
| 20 | Marcel Sabitzer | Always available as an outlet in midfield. Constantly pressing forward and tracking back. Not scared of committing into tackles, instrumental in creating attacking turnovers that led to goals. |
| 24 | Daniel Svensson | Good positioning, good in the air and good ball retention. Vital in their possession gameplan. |
| 26 | Julian Ryerson | Good tracking and awareness of players around him. Defensively sound and good in the air. |
| 27 | Karim Adeyemi | His pace and dribbling ability was a problem for the opposition all through the game. Most attacks in the final third went through him. Scored the first goal and assisted the second. Key player. |
Substitutes Used
| No | Name | Assessment |
|---|---|---|
| 7 | Jobe Bellingham | Very good and assured on the ball. Brought a different dimension to how they attacked and was vital in their equalizer. |
| 10 | Julian Brandt | Main outlet for GK long balls. Good in the air, won aerial duels when the goalkeeper went long. Good with the ball and created the chance that brought about the penalty. Always willing to run behind the defensive line. |
| 13 | Pascal Gross | Brought on to help see the game out. Unfortunately could not make much impact when he came on. |
10
Game Assessment
Dortmund started the game with a good gameplan to limit the chances and spaces for Juventus to play with. This brought about a tight 1st half, as both teams were limited to fewer chances being created. Occasionally, Dortmund players marked in clusters, blocking the Juventus players with the ball from seeing or being able to play out easily. Meanwhile, this was also the case when attacking, as they sometimes played in clusters thereby boxing themselves in each other's path and losing possession.
The 2nd half saw a change in approach as Dortmund moved the ball faster and every attack went through Adeyemi, which resulted in more chances created and goal-scoring opportunities being exploited. A faster ball movement resulted in 3 goals and a penalty scored. However, this also left them exposed — as they continued to press with numbers forward, they left spaces at the back for counter-attacks.
Possession was lost in the middle third and a forward pass released the Juventus striker to run into a 1v1 situation to score. They had a very mobile backline which constantly stepped out fast as the ball changed direction, but a poor pass in the defensive third rather than clearance meant Juventus won the ball deep, and a quick cross into the box caught their offside line out of shape — this was evident in the last 2 goals they conceded in stoppage time.
Lack of proper game management cost them the game, as they went into stoppage time leading 4–2. Good ball retention would have seen them win. After conceding the 3rd goal, they pushed more players forward to score a 5th rather than seeing the game out. They lost possession and shape and conceded a 4th goal at the tail end of the game.
Good gameplan and poor game management cost them the win in this game.
Level 2 Talent Identification in Football — PFSA — thepfsa.co.uk